Updated Jan. 5 2015: Updated for ASP.NET 5 RC1
Updated May 22 2016: Updated for ASP.NET 5 RC2
Bundling and minification is an important optimization technique for managing scripts and stylesheets in any web application. ASP.NET Core MVC takes a different approach than previous versions to solving this problem. In this post I will illustrate the new approach using a simple example.
How it worked before
In previous versions of MVC, bundling and minification were handled by configuring bundles in the web optimization framework. You would define named bundles of JavaScript or CSS code in a BundleConfig class. Let’s take a simple example where the styles for our application are split into 2 separate files. The style bundle would be defined as follows:
bundles.Add(new StyleBundle("~/Content/css").Include( |
In your razor view, you could reference a bundle using the @Scripts and @Styles helpers. If you were running the application in a Debug mode, the @Scripts helper would add individual script references for each file in a bundle. Likewise, the @Styles helper would render individual links to each CSS file in the bundle.
For example, the following code:
@Styles.Render("~/Content/css") |
would render the following HTML when executed in a debug mode:
<link href="/Content/site1.css" rel="stylesheet"/> |
In a Release mode the web optimization framework would optimize the bundles by generating a single combined and minified file for each bundle that is referenced. The same example above in a release configuration would render the following HTML:
<link href="/Content/css?v=NNbQGTaB9DsVxla4W-u6EqSVahvQb1lT0FjAB1yOkvo1" rel="stylesheet"/> |
Testing the optimized and non-optimized versions in Visual Studio was relatively easy. You could turn debug mode on/off from the web.config or manually override turn optimization on/off by setting the BundleTable.EnableOptimizations value at application startup.
How it works in ASP.NET Core MVC
The first big change is that the bundling and minification steps happen at build time instead of run time.
Optimizing assets
In previous versions, the optimized file was created on the fly by the web optimization framework. In ASP.NET Core MVC, you are expected to manage bundling and minification using a task runner like Grunt or Gulp. One of the big advantages to using a task runner for bundling and minification is that we have access to a vast number of existing tasks from the grunt and gulp ecosystems.
The default ASP.NET Core MVC project template uses Gulp so I will use that to show how accomplish this.
First, we will add 2 node packages for the gulp package to bundle (gulp-concat) and minify CSS (gulp-minify-css) files. Add these to the package.json file:
{ |
Next, include these 2 packages in gulpfile.js. Node packages are included in a gulp file using requirejs:var gulp = require("gulp"),
minifycss = require("gulp-minify-css"),
concat = require("gulp-concat");
After that, add a css property to the paths property:var paths = {
bower: "./bower_components/",
lib: "./" + project.webroot + "/lib/",
css: "./" + project.webroot + "/css/",
};
Finally, add a gulp task to combine and minify any CSS files from the css folder.gulp.task("minifycss", function () {
return gulp.src([ paths.css + "/*.css",
"!" + paths.css + "/*.min.css"])
.pipe(minifycss())
.pipe(concat("site.min.css"))
.pipe(gulp.dest(paths.css));
});
You can run this task manually from the command line by calling gulp minifycss:

Another way to run it is using the Task Runner Explorer. Launch the Task Runner Explorer by right clicking gulpefile.js in the Solution Explorer and selecting Task Runner Explorer. From the task runner explorer window, you can run any task by right clicking it and selecting Run.

Important: You can (and should) also configure these tasks to run automatically whenever you change the source css files. See my previous post on using Gulp in Visual Studio for more details on this.
The process for optimizing JavasScript files is very similar to the process for CSS, but we use gulp-uglify instead of gulp-minify-css. We will explore the JavaScript scenario further in the next post.
Now our wwwroot folder contains both optimized and non-optimized versions of our CSS:

Of course, this is just a very simple example of how you might choose to optimize your files. The process is entirely up to you and very flexible. I encourage you to explore the vast set of plugins available.
Managing Development vs Production environments
In previous version of MVC, the @Scripts and @Styles helpers would decide when to reference all the un-optimized files and when to reference the auto-generated optimized versions. The Debug vs Release configuration was used to determine when to use the optimized versions. While this was ultimately convenient from a developer perspective, it was never very clear what was happening. When looking at the razor view, it was hard to tell what has happening.
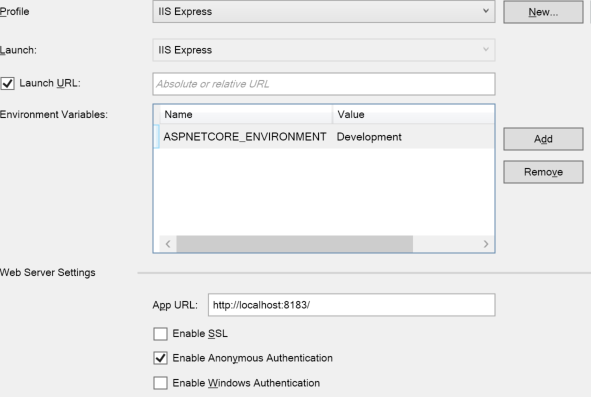
ASP.NET Core you use the ASPNETCORE_ENVIRONMENT environment variable instead of debug/release configurations to decide which files to reference. Typical values for ASPNETCORE_ENVIRONMENT are Development, Staging and Production. The default when running ASP.NET MVC Core from Visual Studio is Development. You can see this by viewing the Properties of your MVC project file in Visual Studio.
In your Razor view, you can use the environment tag helper to decide how to reference your scripts and stylesheets based on the current Hosting:Environment value. The link tag helper is used to append a version to the minified file name in Staging and Production. This technique is often called cache busting. A similar script tag helper exists for referencing script files.
<environment names="Development"> |
Learn more about tag helpers here
Looking at this razor code, it is much more obvious how a file will be reference in Development vs Staging/Production. In Development, the HTML is as follows:
<link rel="stylesheet" href="/css/site1.css" /> |
In Staging and Production, the HTML is as follows:
<link rel="stylesheet" href="/css/site.min.css?v=UdxKHVNJA5vb1EsG9O9uURFDfEE3j1E3DgwL6NiDGMc" /> |
Testing Production from Visual Studio
To test Staging or Production builds from Visual Studio, you need to create a new debug profile and set the Hosting:Environment environment variable to the desired value.
Here are some simple steps to create a Production profile:
- Right click on your project in Solution Explorer and select Properties.
- Select the Debug tab
- Click New… to create a new profile and enter ‘IIS Express - Prod” for the name.
- For Launch, select IIS Express
- Add a new Environment Variable with name
ASPNETCORE_ENVIRONMENTand value Production Save your project.
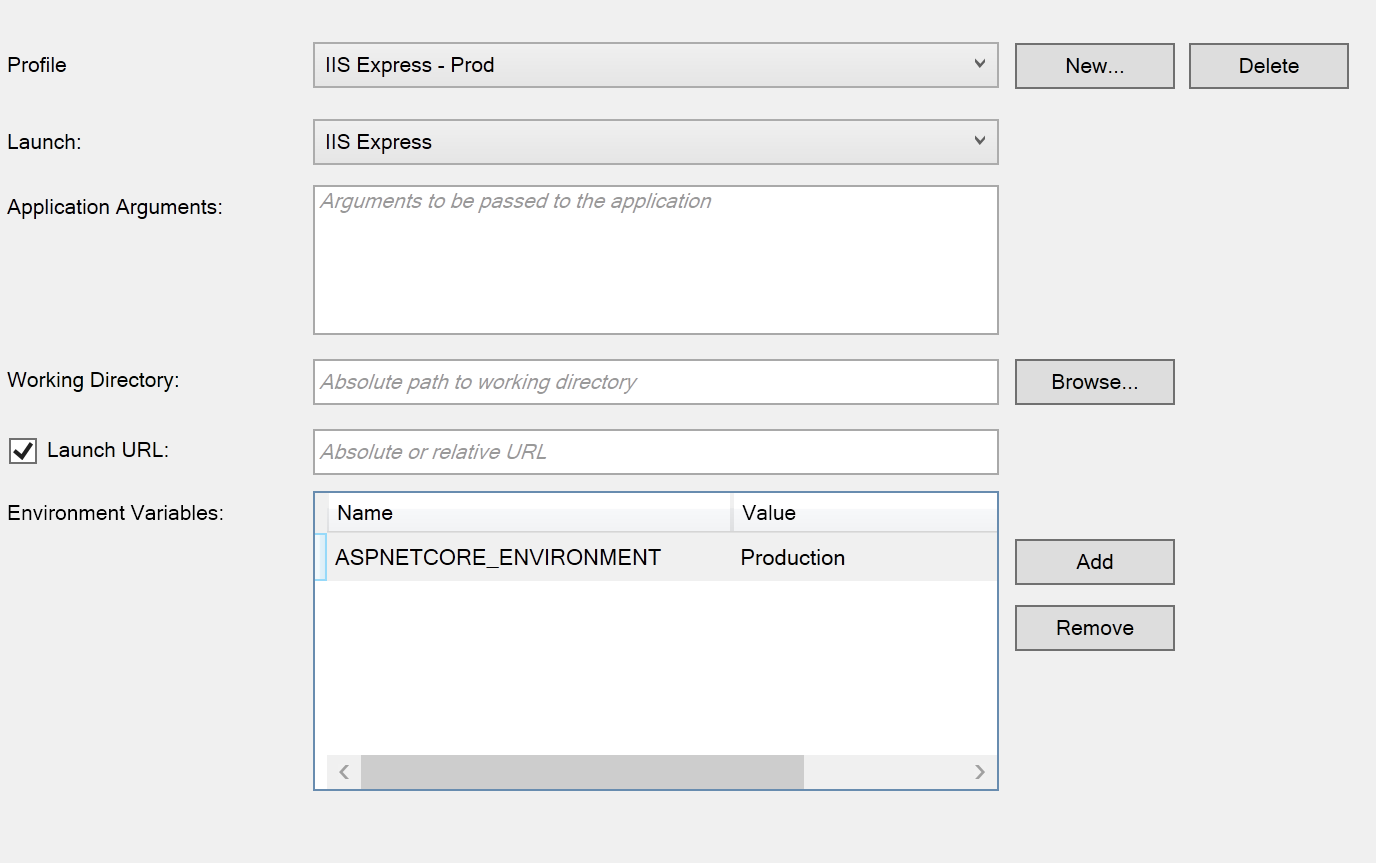
Now, from the Run menu in Visual Studio, you can select the IIS Express – Prod profile to run and test your application using the optimized versions of scripts and styles.

Conclusion
While this new approach for web optimization in ASP.NET Core MVC may seem like a little more work than in previous versions, it does provide much more flexibility and in my opinion aligns better with the majority of the web development world.
We very briefly touched on the link and script tag helpers. There is a lot of functionality available (CDNs, fallbacks, globbing, etc.) in these tag helpers and we will explore these in more detail in the next post –> Overview of Link and Script Tag Helpers in MVC6.