In my last post I touched briefly on how tag helpers can be used as an alternative to HTML helpers in ASP.NET Core MVC.
In this series, we will take a deep dive into the InputTagHelper.
Overview
The input tag helper is used to bind an HTML input element to a model property in your razor view. It is an alternative to `@Html.EditorFor(m => m.MyProperty)`.
Given a view that is bound to the following model class:public class SimpleViewModel
{
public string Email { get; set; }
}
We can specify an input element for the Email property using the asp-for attribute:<input asp-for="Email" />
This will cause the Input Tag Helper to process the input tag on the server side and generate the following HTML to be sent to the browser:<input type="text" id="Email" name="Email" value="thisaddress@isfrommymodel.com" />
The tag helper adds an id and a name based on the property name specified in the asp-for attribute. The type of the input was set to text because the Email property is a string. If the property specified is a bool, then the tag helper will generate a input of type checkbox.
| .NET Type | Input Type |
|---|---|
| String | type=”text” |
| DateTime | type=”datetime” |
| Byte | type=”number” |
| Int16, Int32, Int64 | type=”number” |
| Single, Double | type=”number” |
| Boolean | type=”checkbox” |
Validation and Other Types
In addition to being aware of property types, the input tag helper is also aware of common data annotations for special types and validation. For example, if we add the [Required] attribute to the Email property…
public class SimpleViewModel |
…then the tag helper would output HTML with the data-val-required attribute needed for jQuery Validation on the client side.
<input type="text" data-val="true" |
Adding the [EmailAddress] attribute will change the type to email and add data-val-email so jQuery Validation can validate that the value is a valid email address.
<input name="Email" |
Here are a some attributes that the input tag helper will map to specific input types:
| Attribute | Input Type |
|---|---|
| [EmailAddress] | type=”email” |
| [Url] | type=”url” |
| [HiddenInput] | type=”hidden” |
| [Phone] | type=”tel” |
| [DataType(DataType.Password)] | type=”password” |
| [DataType(DataType.Date)] | type=”date” |
| [DataType(DataType.Time)] | type=”time” |
Navigating Child Properties
You can also navigate to child properties of your view model. Consider a more complex model class that contains a child Address property.public class AddressViewModel
{
public string AddressLine1 { get; set; }
}
public class RegisterViewModel
{
public string UserName { get; set;}
public AddressViewModel Address { get; set; }
}
In the view, we can bind our input to Address.AddressLine1…<input asp-for="Address.AddressLine1" />
…which will generate the following HTML:<input name="Address.AddressLine1" id="Address_AddressLine1" type="text" value="">
Merging HTML Attributes
One of the really nice things about tag helpers is that it allows you to specify additional HTML attributes on an element. If you specify attributes on an input element, the tag helper will merge those attribute with any attributes it also adds to the element.
A simple example is adding a class to an input.<input asp-for="Email" class="form-control" />
…will generate the following HTML:<input class="form-control" type="text" id="Email" name="Email" value="thiscomes@frommymodel.com" />
You can add any additional attribute you want to the input element and it will be included in the generated HTML. This includes any data-* or ng-* attributes that you might be used for a client side framework.
Formatting Values
The input tag helper also provides an asp-format attribute. This attribute allows you to specify a standard .NET string format that will be applied to the value of the input.
For example, if you wanted to display a numeric value to 4 decimal places, you could use the asp-format attributes as follows:<input asp-for="SomeNumber" asp-format="{0:N4}"/>
This would have not add any additional attributes to the input element but would format the value of SomeNumber of 4 decimal places.

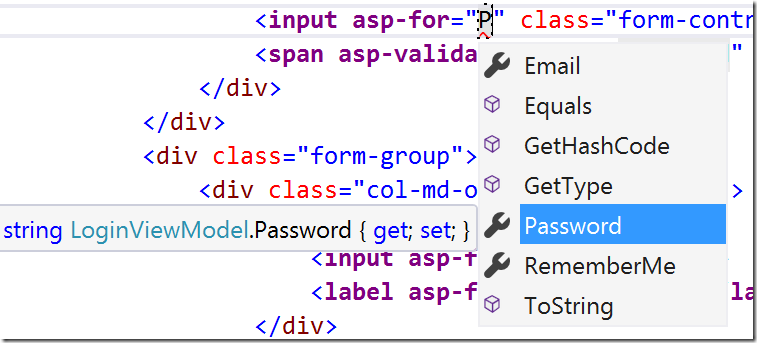
Intellisense and Strong-Typing
Visual Studio 2015 provides Intellisense for the asp-for attribute. As you can see here, it will tell you what properties are available on the current model.
Visual Studio will also highlight errors if we specify a property name that does not exist:

An error is thrown at view compile time. By default, razor views are not pre-compiled when you run your application in Visual Studio so you won’t get the error until you try to dynamically access the page.
Note: At the time of writing this, rename refactorings of model properties do not apply to the asp-for attribute values but I do expect that this will change in the future.
Conclusion
That should cover everything you need to know to start using the input tag helper. In the next blog post, I cover the Validation tag helpers that are used to display client and server side validation messages.