<![CDATA[Dave Paquette]]>2020-05-27T01:44:32.224Zhttp://www.davepaquette.com/Hexo<![CDATA[Scaling Azure Functions from Consumption Plan to Premium Plan (and back again)]]>http://www.davepaquette.com/archive/2020/05/23/scaling-azure-functions-from-consumption-plan-to-premium-hosting-plan.aspx2020-05-23T16:30:00.000Z2020-05-27T01:44:32.224ZAzure Functions, when hosted on a consumption plan, are great for most scenarios. You pay per use which is great for keeping costs down but there are some downsides and limitations. One of those is the time it takes to cold start your function app. If your function app hasn’t been triggered in some time, it can take a while for the a new instance to start up to run your app. Likewise, if a very sudden spike in load occurs, it can take some time for the consumption plan to start up enough instances to handle that load. In the meantime, you might have clients getting timeouts or failed requests.
Azure Functions offers another hosting model called Azure Functions Premium Plan. With premium plans, instead of paying per function execution, you pay for the underlying compute instances that are hosting your functions. This is often more expensive, but it also ensures there are always a pre-set number of warmed instances ready to execute your function.
That’s great, but what if I only really need those pre-warmed instances for a short period of time when I’m expecting a lot of incoming traffic. The rest of the time, I would rather use a Consumption Plan to save on hosting costs.
I thought the choice of hosting plan was something you needed to make up front but it turns out that you can actually move an Azure Function App from a consumption plan to a premium plan (and back again).
Thanks to Simon Timms for starting this discussion on Twitter. We got very helpful responses from folks on the Azure Functions team:
Jeff Hollan has a great sample using an Azure Durable Function to scale an Azure Function App to a premium plan for a specified amount of time, then automatically scale back down to a consumption plan.
This is a super cool sample. It uses the Azure Resource Manager REST API to make changes to the target function app resources. For my project however, I didn’t really want to spin up another Azure Function to manage my Azure Functions. I just wanted an easy way to scale my 12 function apps up to premium plans for a couple hours, then scale them back down to a consumption plan.
I decided to try using the AZ CLI for this and it turned out really well. I was able to write a simple script to scale up and down.
Once installed, you’ll need to login to your Azure Subscription.
az login
A browser window will popup, prompting you to log in to your Azure account. Once you’ve logged in, the browser window will close and the az cli will display a list of subscriptions available in your account. If you have more than one subscription, make sure you select the one you want to use.
az account set --subscription YourSubscriptionId
Create a Resource Group
You will need a resource group for your Storage and CDN resources. If you don’t already have one, create it here.
az group create --name DavesFunctionApps --location WestUS2
Most commands will require you to pass in a --resource-group and --location parameters. These parameters are -g and -l for short, but you can save yourself even more keystrokes by setting defaults for az.
az configure -d group=DavesFunctionApps
az configure -d location=WestUS2
Creating a (temporary) Premium Hosting Plan
There is a strange requirement with Azure Functions / App Service. As per Jeff Hollan’s sample:
The Azure Functions Premium plan is only available in a sub-set of infrastructure in each region. Internally we call these “webspaces” or “stamps.” You will only be able to move your function between plans if the webspace supports both consumption and premium. To make sure your consumption and premium functions land in an enabled webspace you should create a premium plan in a new resource group. Then create a consumption plan in the same resource group. You can then remove the premium plan. This will ensure the consumption function is in a premium-enabled webspace.
First, add an Azure Functions Premium plan to the resource group.
az functionapp plan create -n dave_temp_premium_plan --sku EP1 --min-instances 1
You can delete this premium plan using the command below after you’ve deployed a function app to this resource group . Don’t forget to delete the premium plan. These cost $$$
az functionapp plan delete -n dave_temp_premium_plan
Creating a Function App
There are many options for creating a new function app. I really like the func command line tool which I installed using npm. Check out the Azure Functions Core Tools GitHub Repo for details on other options for installing the func tooling.
npm i -g azure-functions-core-tools@3 --unsafe-perm true
The focus of this blog post is around scaling a function app. If you don’t already have an app built, you can follow along with this walkthrough to create a function app.
A function app requires a Storage Account resource. An Application Insights resource is also highly recommended as this really simplifies monitoring your function app after it has been deployed. Let’s go ahead and create those 2 resources.
az storage account create -n davefuncappstorage
az extension add -n application-insights
az monitor app-insights component create --app davefuncappinsights
Now we can create our Azure Function App resource with a consumption plan, passing in the name of the storage account and app insights resources that we just created. In my case, I’m specifying the dotnet runtime on a Windows host.
az functionapp create --consumption-plan-location WestUS2 --name davefuncapp123 --os-type Windows --runtime dotnet --storage-account davefuncappstorage --app-insights davefuncappinsights --functions-version 3
Remember to delete that temporary Premium Hosting Plan now!
az functionapp plan delete -n dave_temp_premium_plan
Deploying your Function App using the az cli
This is a bit outside the scope of this blog post but I like using the az cli to deploy my function apps because it’s easy to incorporate that into my CI/CD pipelines. Since my app is using the dotnet runtime, I use the dotnet publish command to build the app.
dotnet publish -c release
Then, zip the contents of the publish folder (bin\release\netcoreapp3.1\publish\).
zip -r ./bin/release/netcoreapp3.1/package.zip ./bin/release/netcoreapp3.1/publish/
Finally, use the az functionapp deployment command to deploy the function app.
az functionapp deployment source config-zip -n davefuncapp123 --src ./bin/release/netcoreapp3.1/package.zip
Scale up to a premium plan
Okay, now that we have a functioning (pun intended) app deployed and running on a consumption plan, let’s see what it takes to scale this thing up to a premium plan.
First, create a new Premium Hosting Plan with the parameters that make sense for the load you are expecting. The --sku parameter refers to the size of the compute instance: EP1 is the smallest. The --min-instancs parameter is the number of pre-warmed instances that will always be running for this hosting plan. The --max-burst parameter is the upper bounds on the number of instances that the premium plan can elastically scale out if more instances are needed to handle load.
az functionapp plan create -n davefuncapp123_premium_plan --sku EP1 --min-instances 4 --max-burst 12
Next, move the function app to that premium hosting plan.
az functionapp update --plan davefuncapp123_premium_plan -n davefuncapp123
That’s it! All it took was those 2 command and your function app is now running on a premium plan!
Scale back down to a consumption plan
Of course, that premium plan isn’t cheap. You might only want your function app running on the premium plan for a short period of time. Scaling back down is equally easy.
First, move the function app back to the consumption based plan. In my case, the name of the consumption plan is WestUS2Plan. You should see a consumption plan in your resource group.
az functionapp update --plan WestUS2Plan -n davefuncapp123
Next, delete the premium hosting plan.
az functionapp plan delete -n davefuncapp123_premium_plan
Wrapping it up
In this post, we saw how easy it is to move a function app between Premium and Consumption plans. A couple very simple az commands can help you get the performance and features of the Premium plan only when you need it while taking advantages of the simplicity and cost savings of a Consumption plan the rest of the time.
]]>
Azure Functions, when hosted on a consumption plan, are great for most scenarios. You pay per use which is great for keeping costs down b]]>
<![CDATA[Deploying a Static Site to Azure Using the az CLI]]>http://www.davepaquette.com/archive/2020/05/10/deploying-a-static-site-to-azure-using-the-az-cli.aspx2020-05-10T22:30:00.000Z2020-05-27T01:44:32.224ZI was recently working on a project where the frontend was built in React. The project was hosted on Azure and we wanted to use Azure CDN to host the React app. I have been looking at the az cli recently and decided to use it on this project to script the setup of resources and deployments to Azure.
Once installed, you’ll need to login to your Azure Subscription.
az login
A browser window will popup, prompting you to log in to your Azure account. Once you’ve logged in, the browser window will close and the az cli will display a list of subscriptions available in your account. If you have more than one subscription, make sure you select the one you want to use.
az account set --subscription YourSubscriptionId
Create a Resource Group
You will need a resource group for your Storage and CDN resources. If you don’t already have one, create it here.
az group create --name DavesFancyApp --location SouthCentralUs
Most commands will require you to pass in a --resource-group and --location parameters. These parameters are -g and -l for short, but you can save yourself even more keystrokes by setting defaults for az.
az configure -d group=DavesFancyApp
az configure -d location=SouthCentralUs
Create a Storage Account for Static Hosting
First, create a storage account:
az storage account create --name davefancyapp123
Then, enable static site hosting for this account.
Your storage account will now have a blob container named $web. That contents of that container will be available on the URL accountname.z21.web.core.windows.net/. For example, https://davefancyapp123.z21.web.core.windows.net/.
Deploying your app
To deploy your app to the site, all you need to do is copy your app’s static files to the $web container in the storage account you created above. For my react app, that means running npm run build and copying the build output to the $web container.
az storage blob upload-batch --account-name davefancyapp123 -s ./build -d'$web'
Now your site should be available via the static hosting URL above. That was easy!
Create a CDN Profile and Endpoint
Next up, we are going to put a Content Delivery Network (CDN) endpoint in front of the blob storage account. We want to use a CDN for a couple reasons. First, it’s going to provide much better performance overall. CDNs are optimized for delivering web content to user’s devices and we should take advantage of that as much as possible. The second reason is that a CDN will allow us to configure SSL on a custom domain name.
First, we will need to create a CDN Profile. There are a few different of CDNs offerings available in Azure. You can read about them here. In this example, we will us the Standard Microsoft CDN.
az cdn profile create -n davefancyapp123cdn --sku Standard_Microsoft
Next, we will create the CDN endpoint. Here we need to set the origin to the static hosting URL from the previous step. Note that we don’t include the protocol portion of the URL.
Note: See the az cli docs for more information on the options available when creating a CDN endpoint.
Now your site should be available from endpointname.azureedge.net. In my case https://davefancyapp123cdnendpoint.azureedge.net/. Note that the endpoint is created quickly but it can take some time for the actual content to propagate through the CDN. You might initially get a 404 when you visit the URL.
Create CDN Endpoint Rules
These 2 steps are optional. The first one is highly recommended. The second is optional depending on the type of app your deploying.
First, create URL Redirect rule to redirect any HTTP requests to HTTPS.
Next, if you’re deploying a Single Page Application (SPA) built in your favourite JavaScript framework (e.g. Vue, React, Angular), you will want a URL Rewrite rule that returns the app’s root index.html file for any request to a path that isn’t an actual file. There are many variations on how to write this rule. I found this to be the simplest one that worked for me. Basically if the request path is not for a specific file with a file extension, rewrite to index.html. This allows users to directly navigate to a route in my SPA and still have the CDN serve the index.html that bootstraps the application.
Configuring a domain with an Azure Managed Certificate
The final step in configuring the CDN Endpoint is to configure a custom domain and enable HTTPS on that custom domain.
You will need access to update DNS records for the custom domain. Add a CNAME record for your subdomain that points to the CDN endpoint URL. For example, I created a CNAME record on my davepaquette.com domain:
And finally, enable HTTPs. Unfortunately, this step fails due to a bug in the AZ CLI. There’s a fix on it’s way for this but it hasn’t been merged into the CLI tool yet.
az cdn custom-domain enable-https --endpoint-name davefancyapp123cdnendpoint --profile-name davefancyapp123cdn --name fancyapp-domain
Due to the bug, this command returns InvalidResource - The resource format is invalid. For now, you can do this step manually in the Azure Portal. When using CDN Managed Certificates, the process is full automated. Azure will verify your domain using the CNAME record above, provision a certificate and configure the CDN endpoint to use that certificate. Certificates are fully managed by Azure. That includes generating new certificates so you don’t need to worry about your certificate expiring.
CDN Managed Certificates for Root Domain
My biggest frustration with Azure CDN Endpoints is that CDN managed certificates are not supported for the apex/root domain. You can still use HTTPS but you need to bring your own certificate.
The same limitation exists for managed certificates on App Service. If you share my frustration, please upvote here.
Deploying updates to your application
The CDN will cache your files. That’s great for performance but can be a royal pain when trying to deploy updates to your application. For SPA apps, I have found that simply telling the CDN to purge index.html is enough to ensure updates are available very shortly after deploying a new version. This works because most JavaScript frameworks today use WebPack which does a good job of cache-busting your JavaScript and CSS assets. You just need to make sure the browser is able to get the latest version of index.html and updates flow through nicely.
When you upload your latest files to blob storage, follow it with a purge command for index.html on the CDN endpoint.
az storage blob upload-batch --account-name davefancyapp123 -s ./build -d'$web' az cdn endpoint purge -n davefancyapp123cdnendpoint --profile-name davefancyapp123cdn --no-wait --content-paths '/''/index.html'
The purge command can take a while to complete. We pass the --no-wait option so the command returns immediately.
My thoughts on az
Aside from the bug I ran in to with enabling HTTPS on the CDN endpoint, I’ve really enjoyed my experience with the az cli. I was able to fully automate resource creation and deployments using the GitHub Actions az cli action. I can see az becoming my preferred method of managing Azure resources.
]]>
I was recently working on a project where the frontend was built in React. The project was hosted on Azure and we wanted to use Azure CDN]]>
<![CDATA[Enhancing Application Insights Request Telemetry]]>http://www.davepaquette.com/archive/2020/03/07/enhancing-application-insights-request-telemetry.aspx2020-03-08T00:24:26.000Z2020-05-12T02:02:47.204ZThis post is a continuation of my series about using Application Insights in ASP.NET Core. Today we will take a deeper dive into Request telemetry.
Request Telemetry
For an ASP.NET Core process, the Application Insights SDK will automatically collect data about every request that the server process receives. This specific type of telemetry is called Request telemetry and it contains a ton of very useful data including: the request path, the HTTP verb, the response status code, the duration, the timestamp when the request was received.
The default data is great, but I often find myself wanting more information. For example, in a multi-tenant application, it would be very useful to track the tenant id as part of the request telemetry. This would allow us to filter data more effectively in the Application Insights portal and craft some very useful log analytics queries.
Adding custom data to Request Telemetry
All types of telemetry in Application Insights provide an option to store custom properties. In the previous post, we saw how to create an ITelemetryInitializer to set properties on a particular telemetry instance. We could easily add custom properties to our Request telemetry using a telemetry initializer.
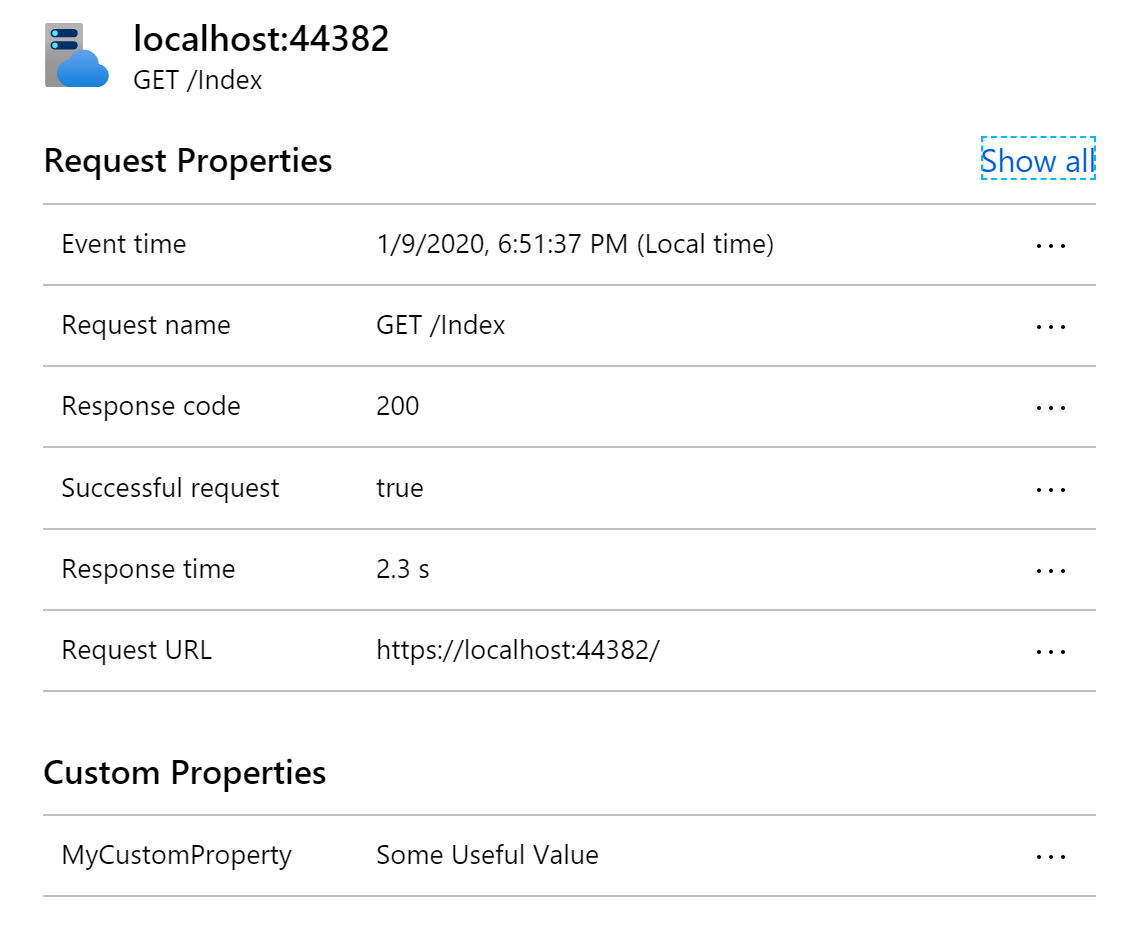
Any custom properties you add will be listed under Custom Properties in the Application Insights portal.
But telemetry initializers are singletons and often don’t have access to the useful data that we want to add to request telemetry. Typically the data we want is related in some way to the current request and that data wouldn’t be available in a singleton service. Fortunately, there is another easy way to get an instance of the request telemetry for the current request.
var requestTelemetry = HttpContext.Features.Get<RequestTelemetry>();
requestTelemetry.Properties["TenantId"] = "ACME_CORP";
You can do it anywhere you have access to an HTTP Context. Some examples I have seen include: Middleware, ActionFilters, Controller action methods, OnActionExecuting in a base Controller class and PageModel classes in Razor Pages.
Filtering by Custom Properties in the Portal
Once you’ve added custom properties to Request Telemetry, you can use those custom properties to filter data in the Application Insights portal. For example, you might want to investigate failures that are occurring for a specific tenant or investigate performance for a particular tenant.
This type of filtering can be applied almost anywhere in the portal and can help narrow things down when investigating problems.
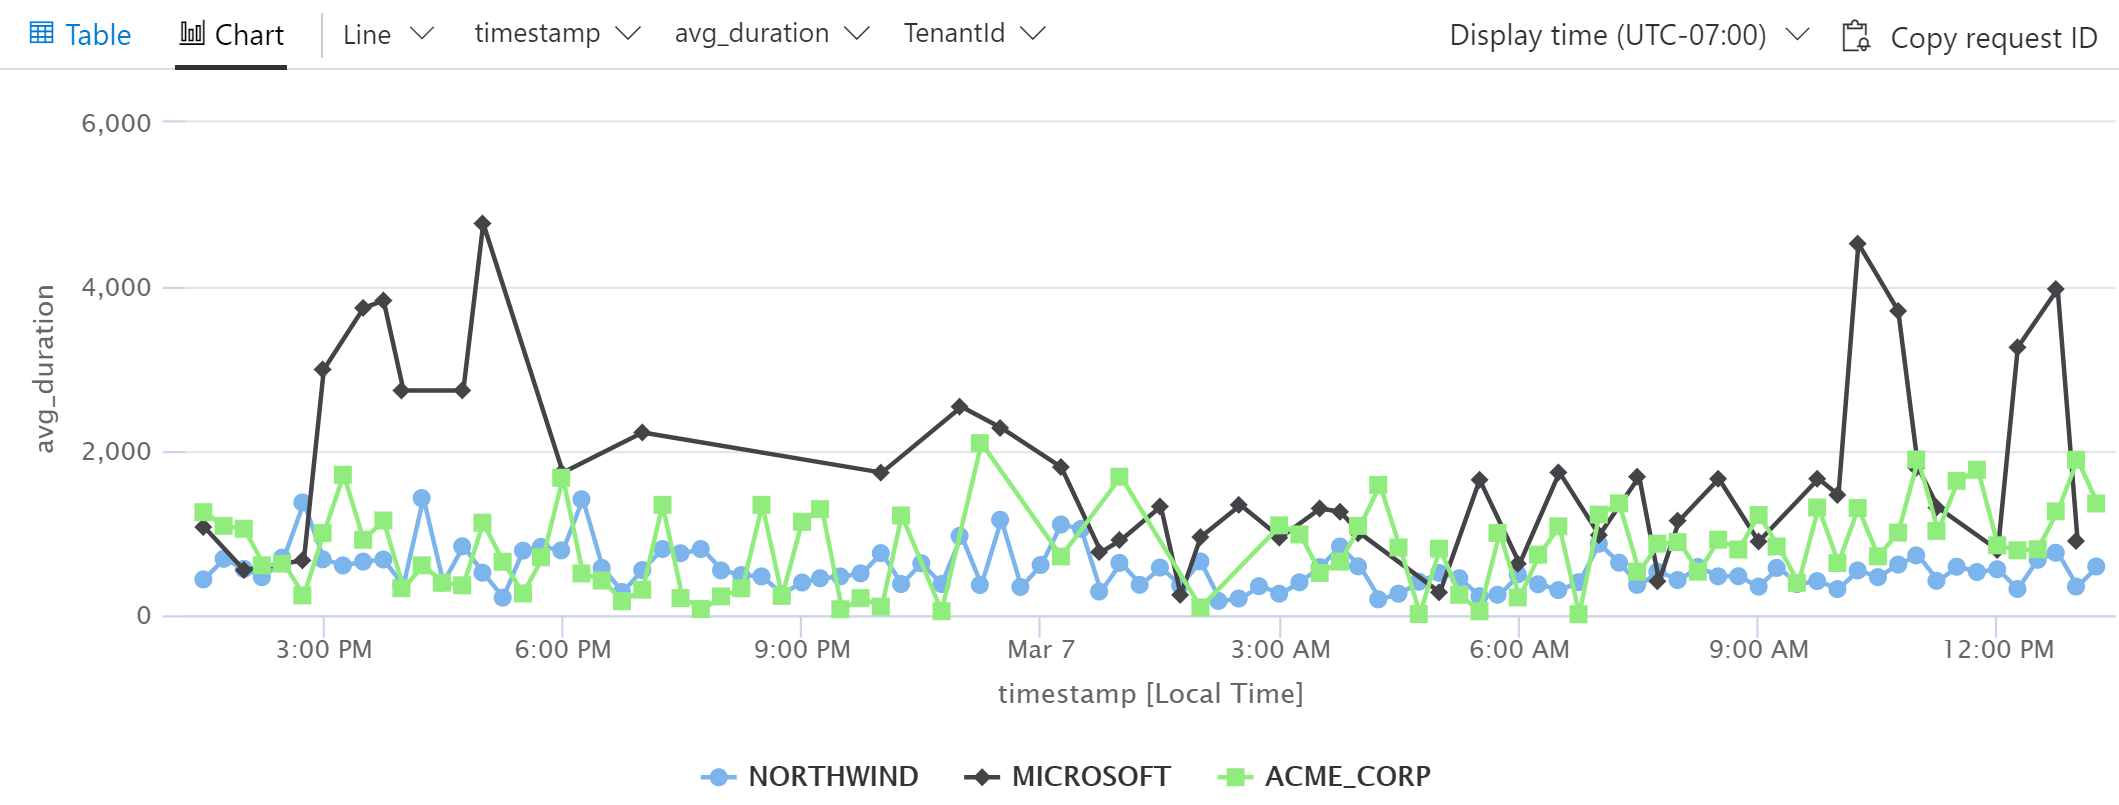
Writing Useful Log Analytics Queries
Now this is where things get really interesting for me. What if we had one particular tenant complaining about performance. Wouldn’t it be interesting to plot out the average request duration for all tenants? We can easily accomplish this using a log analytics query.
This simple query will produce the following chart:
Small variations on this query can be extremely useful in comparing response times, failure rates, usage and pretty much anything else you can think of.
Wrapping it up
TenantId is just an example of a custom property. The custom properties that are useful for a particular application tend to emerge naturally as you’re investigating issues and sifting through telemetry in Application Insights. You will eventually find yourself saying “I wish I knew what xxx was for this request`. When that happens, stop and add that as a custom property to the request telemetry. You’ll thank yourself later.
]]>
This post is a continuation of my series about using <![CDATA[Setting Cloud Role Name in Application Insights]]>http://www.davepaquette.com/archive/2020/02/05/setting-cloud-role-name-in-application-insights.aspx2020-02-06T00:59:38.000Z2020-05-12T02:02:47.203ZThis post is a continuation of my series about using Application Insights in ASP.NET Core. Today we will explore the concept of Cloud Role and why it’s an important thing to get right for your application.
In any application that involves more than a single server process/service, the concept of Cloud Role becomes really important in Application Insights. A Cloud Role roughly represents a process that runs somewhere on a server or possibly on a number of servers. A cloud role made up of 2 things: a cloud role name and a cloud role instance.
Cloud Role Name
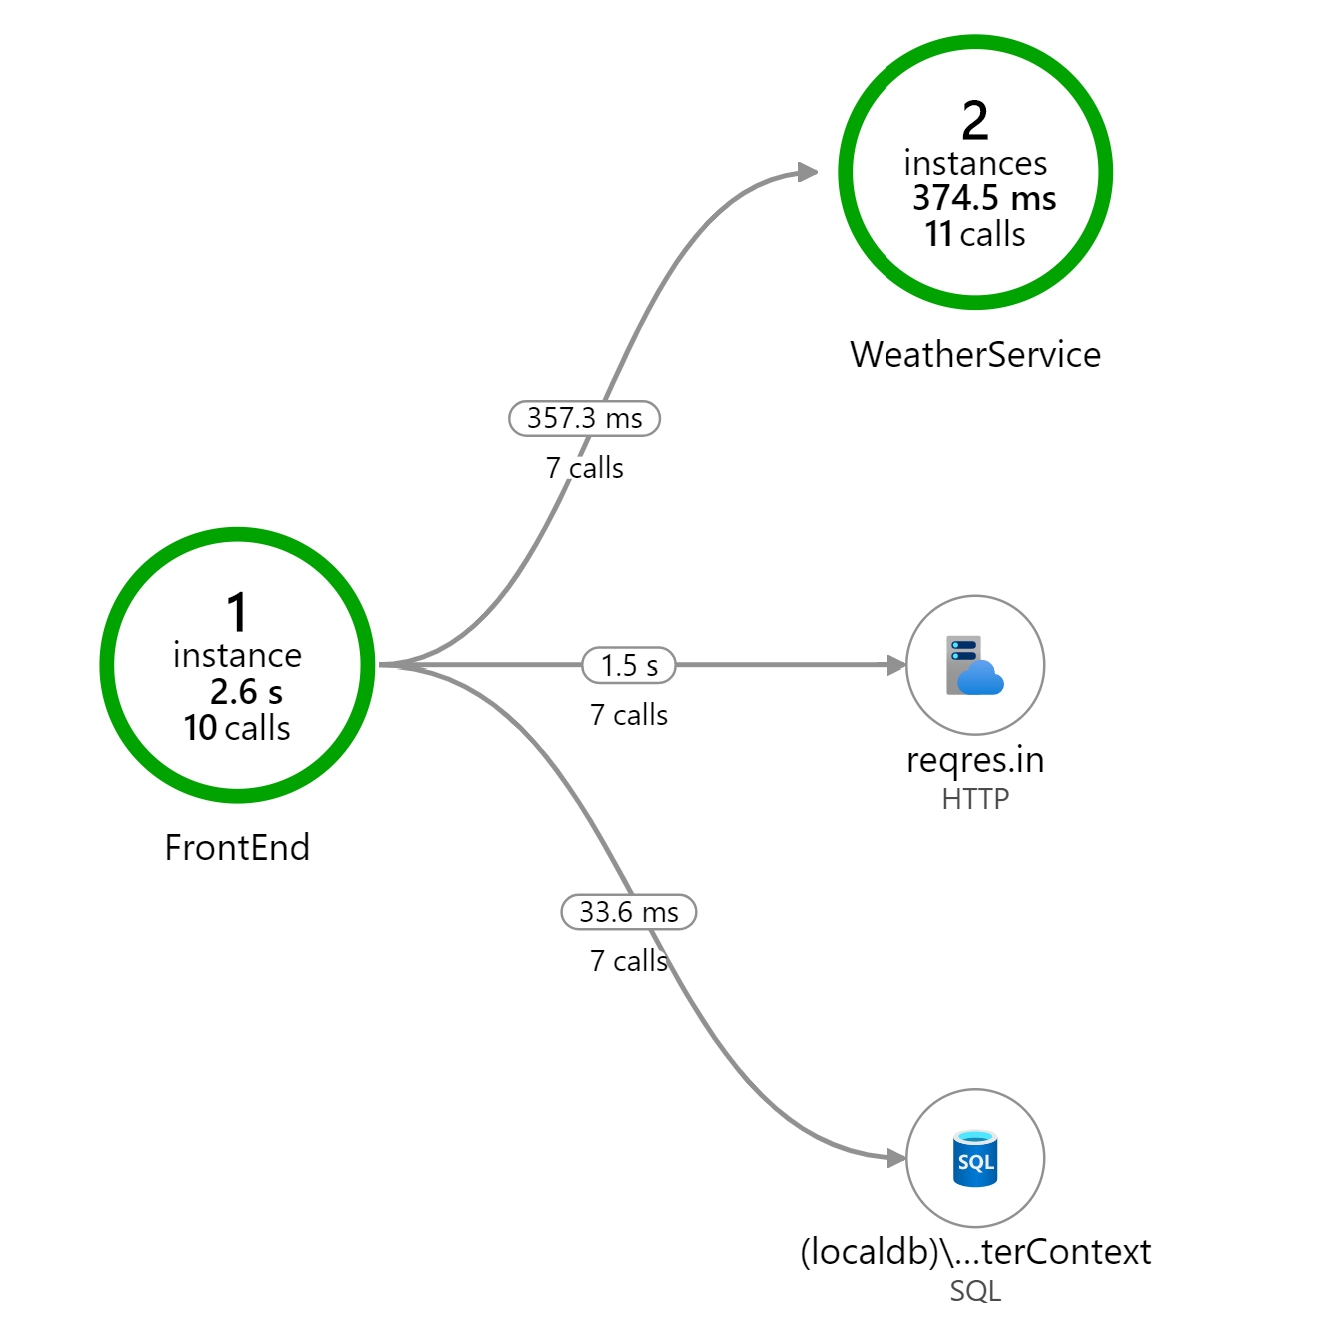
The cloud role name is a logical name for a particular process. For example, I might have a cloud role name of “Front End” for my front end web server and a name of “Weather Service” for a service that is responsible for providing weather data.
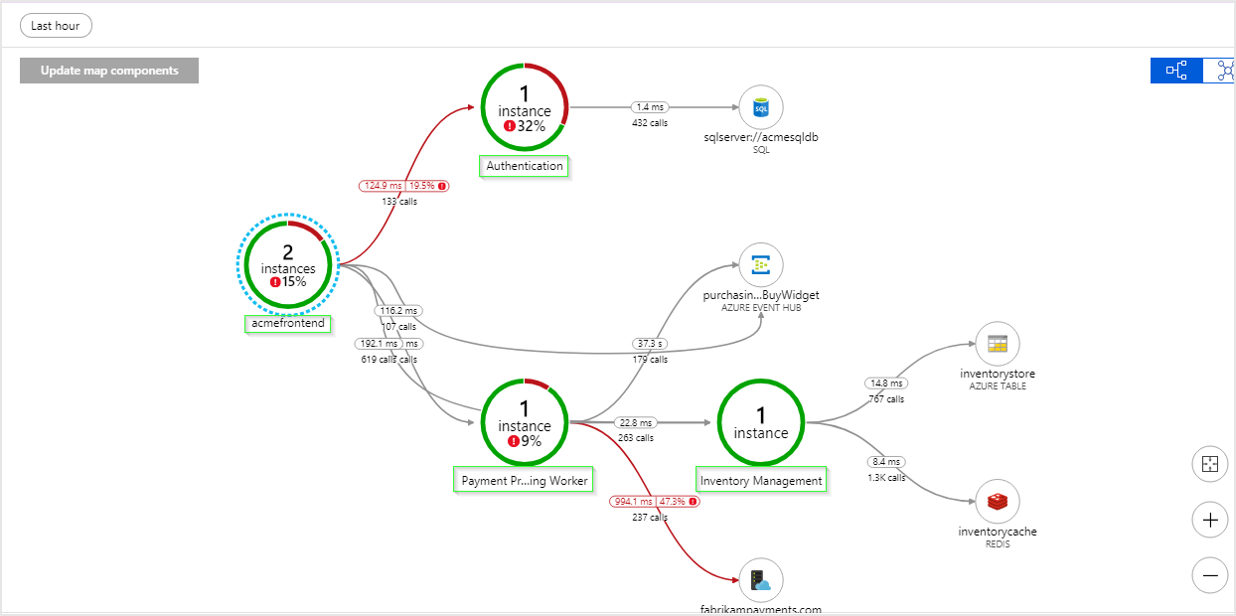
When a cloud role name is set, it will appear as a node in the Application Map. Here is an example showing a Front End role and a Weather Service role.
However, when Cloud Role Name is not set, we end up with a misleading visual representation of how our services communicate.
By default, the application insights SDK attempts to set the cloud role name for you. For example, when you’re running in Azure App Service, the name of the web app is used. However, when you are running in an on-premise VM, the cloud role name is often blank.
Cloud Role Instance
The cloud role instance tells us which specific server the cloud role is running on. This is important when scaling out your application. For example, if my Front End web server was running 2 instances behind a load balancer, I might have a cloud role instance of “frontend_prod_1” and another instance of “frontend_prod_2”.
The application insights SDK sets the cloud role instance to the name of the server hosting the service. For example, the name of the VM or the name of the underlying compute instance hosting the app in App Service. In my experience, the SDK does a good job here and I don’t usually need to override the cloud role instance.
Setting Cloud Role Name using a Telemetry Initializer
Telemetry Initializers are a powerful mechanism for customizing the telemetry that is collected by the Application Insights SDK. By creating and registering a telemetry initializer, you can overwrite or extend the properties of any piece of telemetry collected by Application Insights.
To set the Cloud Role Name, create a class that implements ITelemetryInitializer and in the Initialize method set the telemetry.Context.Cloud.RoleName to the cloud role name for the current application.
publicclassCloudRoleNameTelemetryInitializer : ITelemetryInitializer { publicvoidInitialize(ITelemetry telemetry) { // set custom role name here telemetry.Context.Cloud.RoleName = "Custom RoleName"; } }
Next, in the Startup.ConfigureServices method, register that telemetry initializer as a singleton.
For those who learn by watching, I have recorded a video talking about using telemetry initializers to customize application insights.
Using a Nuget Package
Creating a custom telemetry initializer to set the cloud role name is a simple enough, but it’s something I’ve done so many times that I decided to publish a Nuget package to simplify it even further.
First, add the AspNetMonsters.ApplicationInsights.AspNetCore Nuget package:
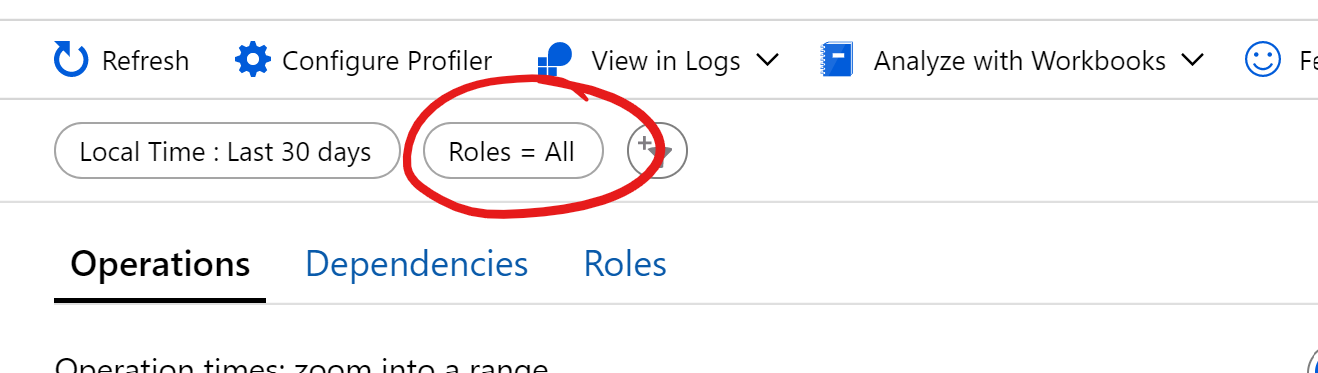
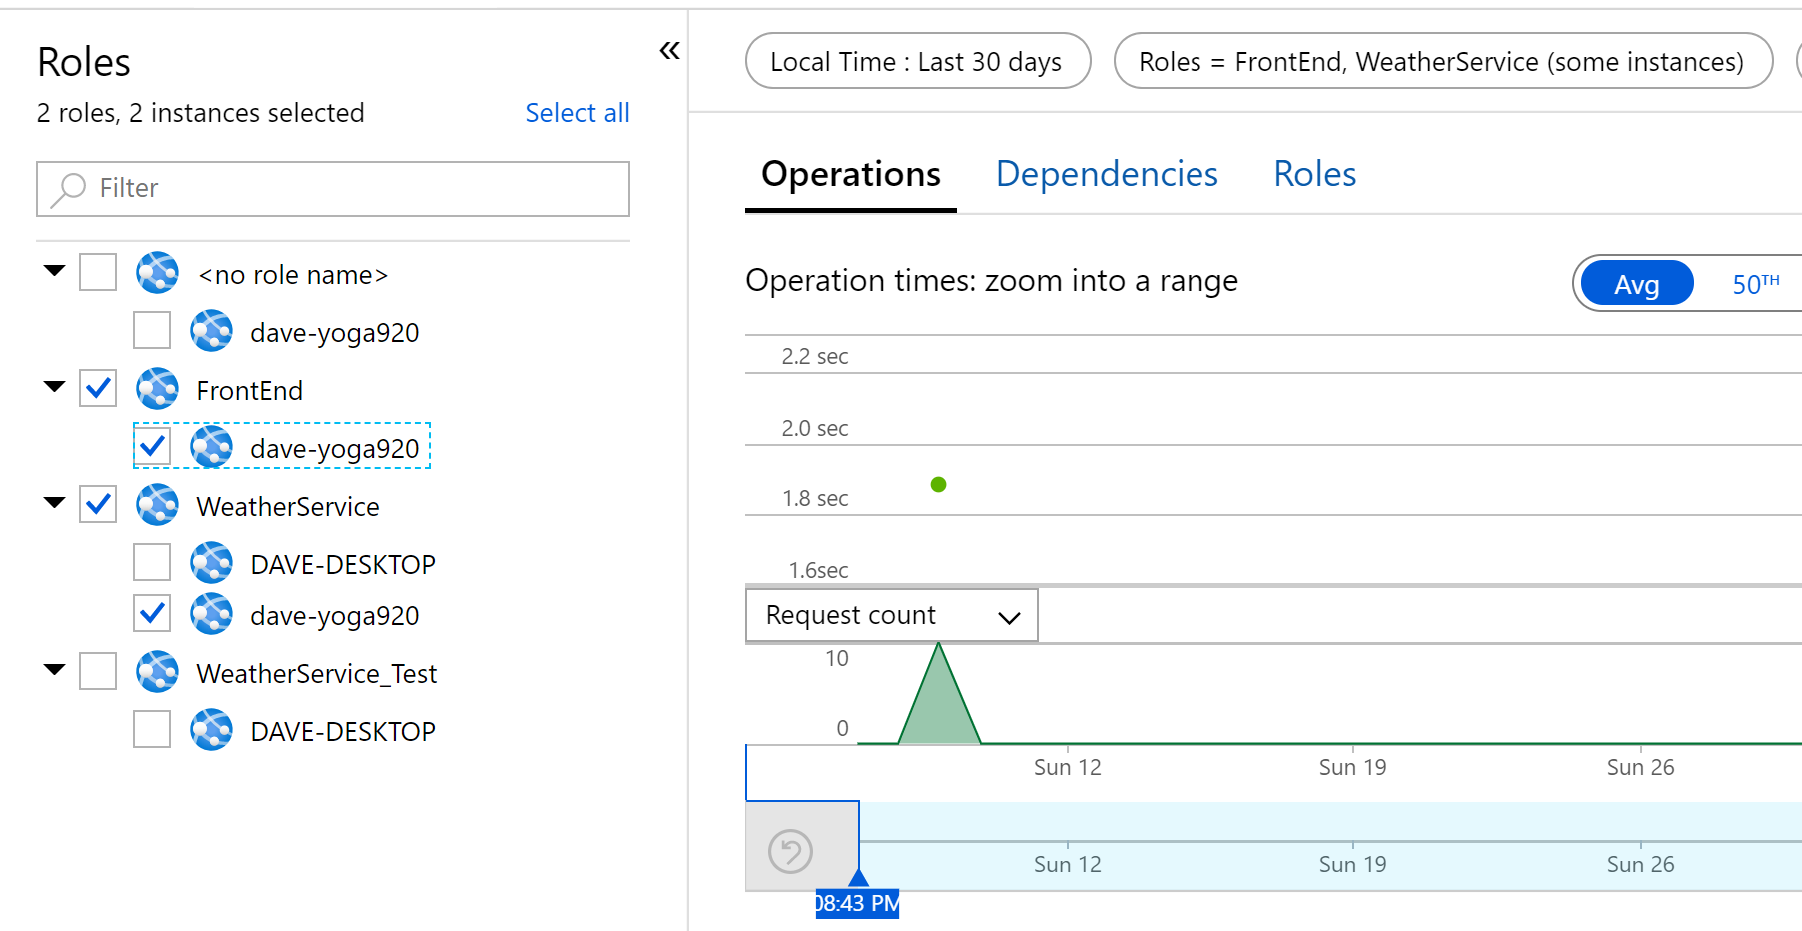
Setting the Cloud Role Name / Instance is about a lot more than seeing your services laid out properly in the Application Map. It’s also really important when you starting digging in to the performance and failures tabs in the Application Insights portal. In fact, on most of the sections of the portal, you’ll see this Roles filter.
The default setting is all. When you click on it, you have the option to select any combination of your application’s role names / instances. For example, maybe I’m only interested in the FrontEnd service and WeatherService that were running on the dave_yoga920 instance.
These filters are extremely useful when investigating performance or errors on a specific server or within a specific service. The more services your application is made up of, the more useful and essential this filtering become. These filters really help focus in on specific areas of an application within the Application Insights portal.
Next Steps
In this post, we saw how to customize telemetry data using telemetry initializers. Setting the cloud role name is a simple customization that can help you navigate the massive amount of telemetry that application insights collects. In the next post, we will explore a more in complex example of using telemetry initializers.
]]>
This post is a continuation of my series about using <![CDATA[Getting the Most Out of Application Insights for .NET (Core) Apps]]>http://www.davepaquette.com/archive/2020/01/20/getting-the-most-out-of-application-insights-for-net-core-apps.aspx2020-01-20T16:50:18.000Z2020-05-12T02:02:47.203ZApplication Insights is a powerful and surprisingly flexible application performance monitoring (APM) service hosted in Azure. Every time I’ve used Application Insights on a project, it has opened the team’s eyes to what is happening with our application in production. In fact, this might just be one of the best named Microsoft products ever. It literally provides insights into your applications.
Application Insights has built-in support for .NET, Java, Node.js, Python, and Client-side JavaScript based applications. This blog post is specifically about .NET applications. If you’re application is built in another language, head over to the docs to learn more.
Codeless Monitoring vs Code-based Monitoring
With codeless monitoring, you can configure a monitoring tool to run on the server (or service) that is hosting your application. The monitoring tool will monitor running processes and collect whatever information is available for that particular platform. There is built in support for Azure VM and scale sets, Azure App Service, Azure Cloud Services, Azure Functions, Kubernetes applications and On-Premises VMs. Codeless monitoring is a good option if you want to collect information for applications that have already been built and deployed, but you are generally going to get more information using Code-based monitoring.
With code-based monitoring, you add the Application Insights SDK. The steps for adding the SDK are well document for ASP.NET Core, ASP.NET, and .NET Console applications so I don’t need to re-hash that here.
If you prefer, I have recorded a video showing how to add Application Insights to an existing ASP.NET Core application.
Telemetry
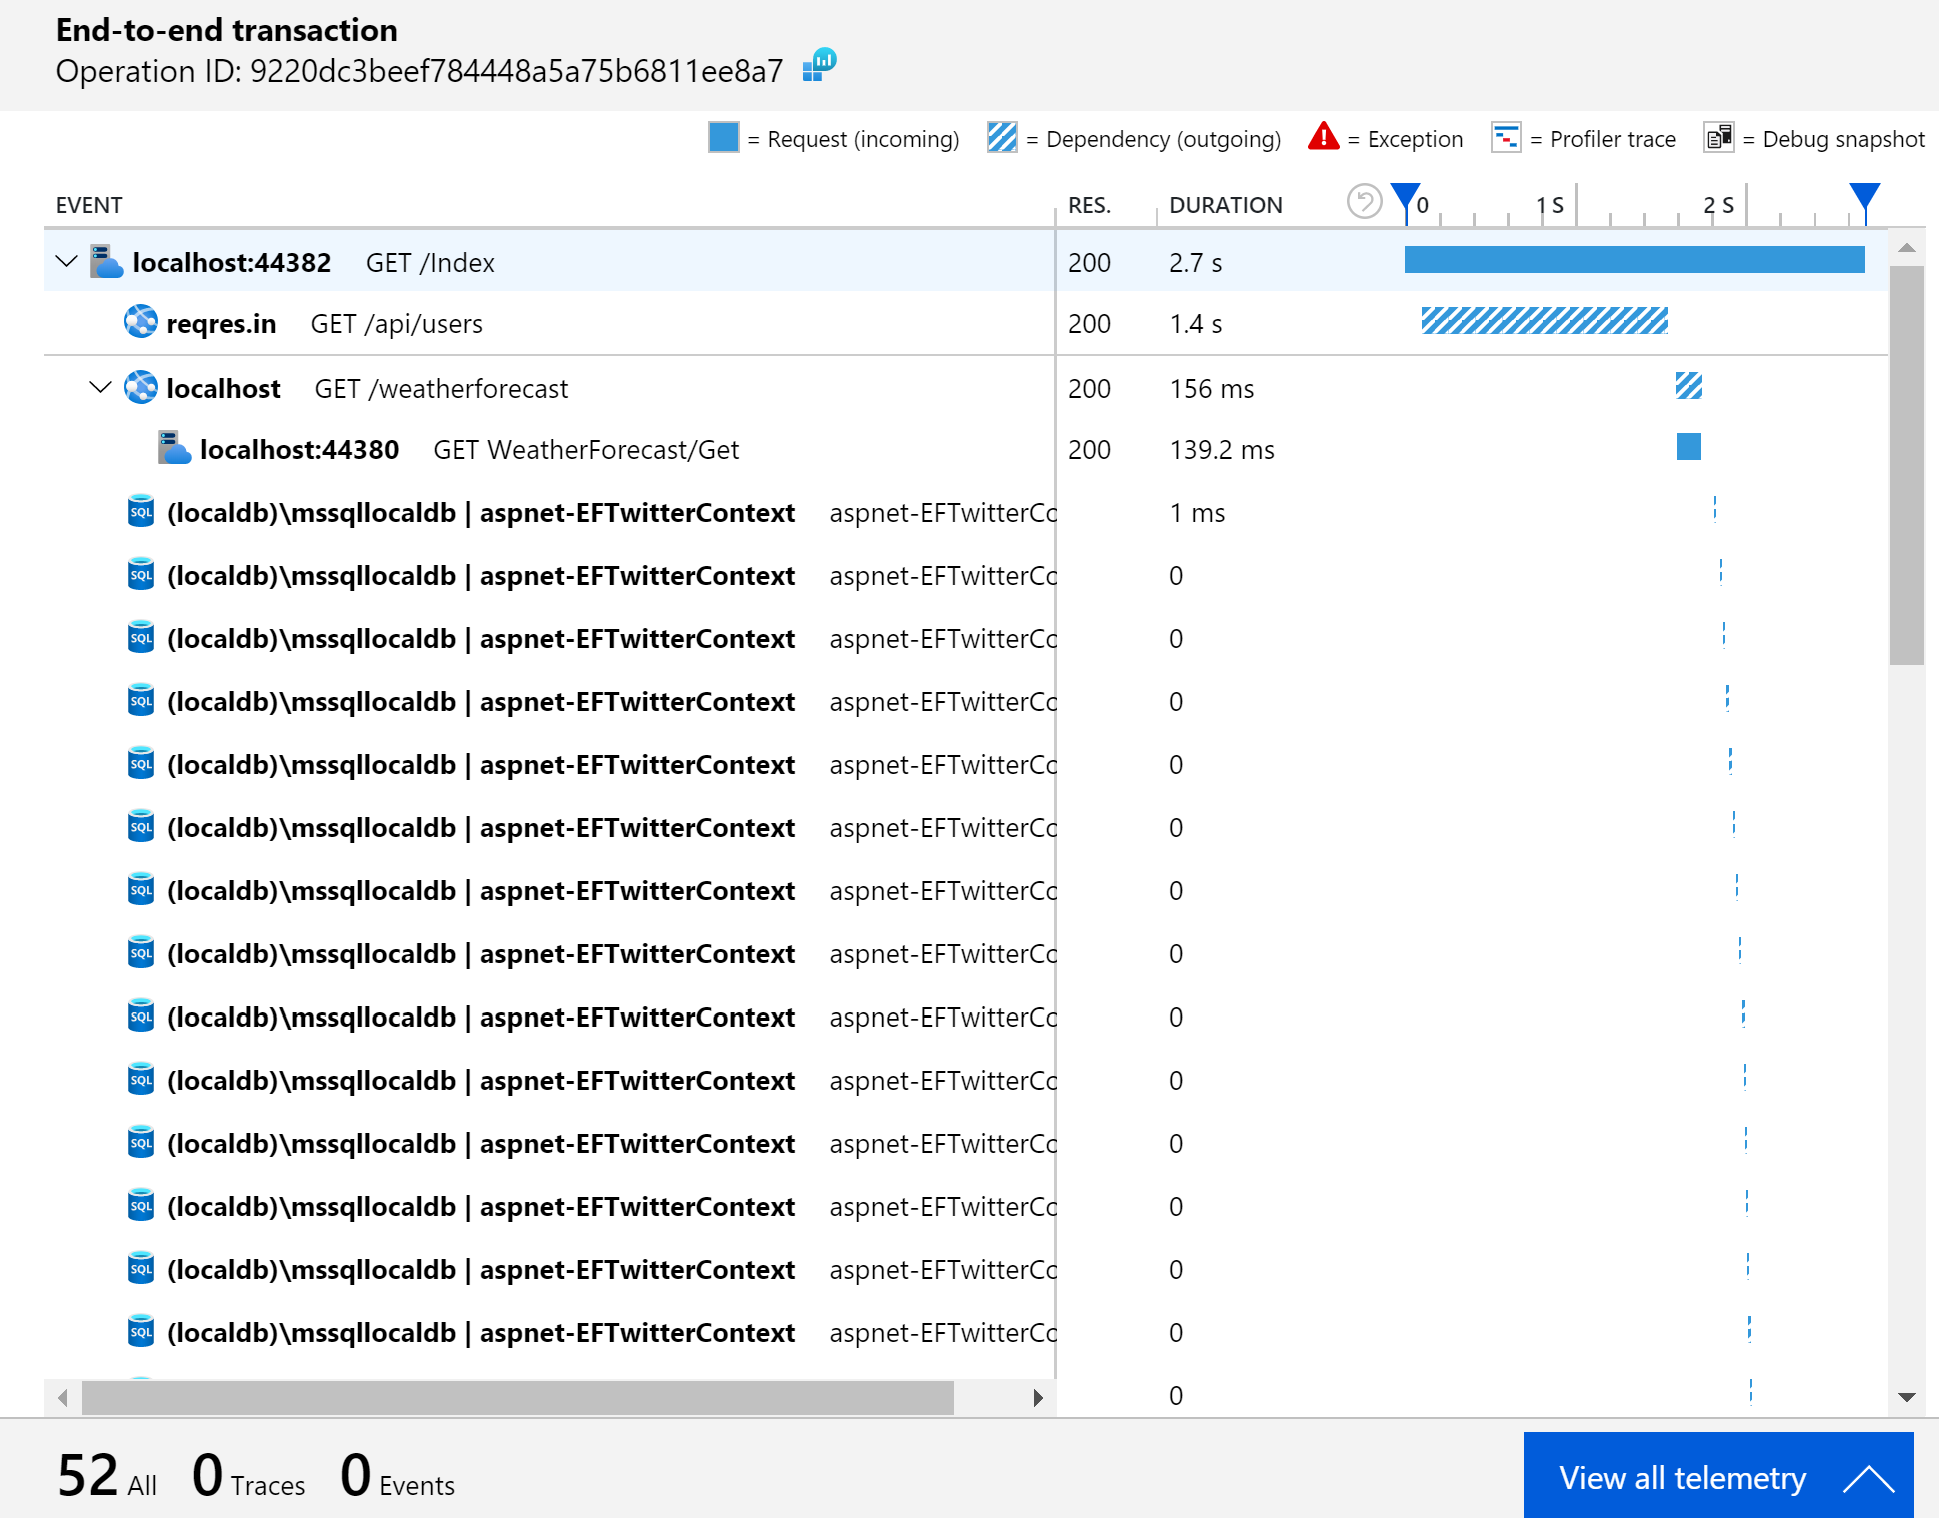
Once you’ve added the Application Insights SDK to your application, it will start collecting telemetry data at runtime and sending it to Application Insights. That telemetry data is what feeds the UI in the Application Insights portal. The SDK will automatically collection information about your dependencies calls to SQL Server, HTTP calls and calls to many popular Azure Services. It’s the dependencies that often are the most insightful. In a complex system it’s difficult to know exactly what dependencies your application calls in order to process an incoming request. With App Insights, you can see exactly what dependencies are called by drilling in to the End-to-End Transaction view.
In addition to dependencies, the SDK will also collect requests, exceptions, traces, customEvents, and performanceCounters. If your application has a web front-end and you add the JavaScript client SDK, you’ll also find pageViews and browserTimings.
Separate your Environments
The SDK decides which Application Insights instance to send the collected telemetry based on the configured Instrumentation Key.
In the ASP.NET Core SDK, this is done through app settings:
When you’re diagnosing an issue in production or investigating performance in your production systems, you don’t want any noise from your development or staging environments. I always recommend creating an Application Insights resource per environment. In the Azure Portal, you’ll find the instrumentation key in the top section of the Overview page for your Application Insights resource. Just grab that instrumentation key and add it to your environment specific configuration.
Use a single instance for all your production services
Consider a micro-services type architecture where your application is composed of a number of services, each hosted within it’s own process. It might be tempting to have each service point to a separate instance of Application Insights.
Contrary to the guidance of separating your environments, you’ll actually get the most value from Application Insights if you point all your related production services to a single Application Insights instance. The reason for this is that Application Insights automatically correlates telemetry so you can track a particular request across a series of separate services. That might sound a little like magic but it’s not actually as complicated as it sounds.
It’s this correlation that allows the Application Map in App Insights to show exactly how all your services interact with each other.
It also enables the end-to-end transaction view to show a timeline of all the calls between your services when you are drilling in to a specific request.
This is all contingent on all your services sending telemetry to the same Application Insights instance. The Application Insights UI in the Azure Portal has no ability to display this visualizations across multiple Application Insights instances.
You don’t need to be on Azure
I’ve often heard developers say “I can’t use Application Insights because we’re not on Azure”. Well, you don’t need to host your application on Azure to use Application Insights. Yes, you will need an Azure subscription for the Application Insights resource, but your application can be hosted anywhere. That includes your own on-premise services, AWS or any other public/private cloud.
Next Steps
Out of the box, Application Insights provides a tremendous amount of value but I always find myself having to customize a few things to really get the most out of the telemetry. Fortunately, the SDK provides some useful extension points. My plan is to follow up this post with a few more posts that go over those customizations in detail. I also have started to create a NuGet package to simplify those customizations so stay tuned!