In today’s post, I will cover the Label Tag Helper.
The label tag helper is probably the most boring simplest of all the MVC tag helpers. Its purpose is simply to generate a label element for a property on your model. You use it by adding the asp-for attribute to a label element.
For example, given a model class with an Email property as follows:
we can bind the Email property of our model to a label as follows:
<labelasp-for="Email"></label>
…which will generate the following HTML:
<labelfor="Email">Email Address</label>
Notice that the value of the generated for attribute matches the name of the property while the content of the label matches the Name from the Display attribute of the email property.
As with all the other tag helpers, other attributes are merged in with the generated HTML. Adding a class or any other attribute to the label tag will be included in the generated HTML. For example, adding 2 classes to the label as follows:
This is an alternative to the Html.LabelFor HTML helper method.
That’s all there is to the label tag helper. You might be wondering why you would use this instead of simply typing the label element without the tag helper. I suppose the best reason would be that you automatically get the label value from the Display attribute. You also get strong typing with the model property. In theory, if rename refactoring should automatically get applied to the tag helper but this is not working in the current preview of ASP.NET Tooling for Visual Studio.
In the last post I explored the functionality of the ASP.NET Core MVC input tag helper. This included the ability for the input tag helper to add client side validation attributes to input elements based on data annotation attributes on your model classes. What I didn’t discuss is how we can display those validation messages. That’s where the validation tag helpers come in.
There are 2 validation tag helpers: the Validation Message tag helper and the Validation Summary tag helper.
Validation Message Tag Helper
The validation message tag helper is used to display a validation message for a specific property of your model class. To use it, simply add the asp-validation-for attribute to a span element.
<spanasp-validation-for="Email"></span>
This will generate a span containing validation messages for the specified property. For example, if the email property is required and the user did not specify it, the email tag helper would generate the following HTML:
<spanclass="field-validation-error" data-valmsg-replace="true" data-valmsg-for="Email"> The Email field is required.</span>
The tag helper found a model validation message for the Email property and placed it inside the span. It also added some data-val attributes so jQuery Validation knows where to place client side validation messages for the Email property.
Typically, we would place a validation message tag helper directly after the input tag helper for the same property. This allows for the validation message to be displayed in close proximity to the input that it applies to.
Note, this tag helper is an alternative to the _@Html.ValidationMessageFor(m => m.Email)_ html helper method.
Merging HTML Attributes
Like all tag helpers, the validation message tag helper will merge the attributes it adds with any other attributes you add to the span. For example, we can add our own class=”text-danger” to the span:
<spanclass="text-danger field-validation-error" data-valmsg-replace="true" data-valmsg-for="Email"> The Email field is required.</span>
Validation Summary Tag Helper
While the validation message tag helper is used to display validation messages that apply to a single property of your model, the validation summary tag helper is used to display validation messages that apply to your entire mode. You can optionally specify to include all property level validation messages in the summary or only display the messages that apply at the model level.
To use this tag helper, by add the asp-validation-summary attribute to a div element. The value of the attribute can be ValidationSummary.All, ValidationSummary.ModelOnly or ValidationSummary.None.
ValidationSummary.All will display both property and model level validations messages while ValidationSummary.ModelOnly will display only validation messages that apply to the model level. If ValidationSummary.None is specified, the tag helper will do nothing, which seems like a very strange thing to do. Instead of None, I would recommend you just not add the asp-validation-summary attribute in the first place.
<divasp-validation-summary="All"></div>
This would generate the following HTML when there are no validation messages to display:
If the model has errors, it would generate something like this:
<divclass="validation-summary-errors"data-valmsg-summary="true"> <ul> <li>The Email field is required.</li> <li>The Password field is required.</li> </ul> </div>
HTML attribute merging works too. You can add attributes to the div and they will be included in the generated HTML.
In my last post I touched briefly on how tag helpers can be used as an alternative to HTML helpers in ASP.NET Core MVC.
In this series, we will take a deep dive into the InputTagHelper.
Overview
The input tag helper is used to bind an HTML input element to a model property in your razor view. It is an alternative to `@Html.EditorFor(m => m.MyProperty)`.
Given a view that is bound to the following model class:
The tag helper adds an id and a name based on the property name specified in the asp-for attribute. The type of the input was set to text because the Email property is a string. If the property specified is a bool, then the tag helper will generate a input of type checkbox.
.NET Type
Input Type
String
type=”text”
DateTime
type=”datetime”
Byte
type=”number”
Int16, Int32, Int64
type=”number”
Single, Double
type=”number”
Boolean
type=”checkbox”
Validation and Other Types
In addition to being aware of property types, the input tag helper is also aware of common data annotations for special types and validation. For example, if we add the [Required] attribute to the Email property…
…then the tag helper would output HTML with the data-val-required attribute needed for jQuery Validation on the client side.
<inputtype="text"data-val="true" data-val-required="The Email field is required." id="Email" name="Email" value="" />
Adding the [EmailAddress] attribute will change the type to email and add data-val-email so jQuery Validation can validate that the value is a valid email address.
<inputname="Email" id="Email" type="text" value="" data-val-required="The Email field is required." data-val="true">
Here are a some attributes that the input tag helper will map to specific input types:
Attribute
Input Type
[EmailAddress]
type=”email”
[Url]
type=”url”
[HiddenInput]
type=”hidden”
[Phone]
type=”tel”
[DataType(DataType.Password)]
type=”password”
[DataType(DataType.Date)]
type=”date”
[DataType(DataType.Time)]
type=”time”
Navigating Child Properties
You can also navigate to child properties of your view model. Consider a more complex model class that contains a child Address property.
One of the really nice things about tag helpers is that it allows you to specify additional HTML attributes on an element. If you specify attributes on an input element, the tag helper will merge those attribute with any attributes it also adds to the element.
You can add any additional attribute you want to the input element and it will be included in the generated HTML. This includes any data-* or ng-* attributes that you might be used for a client side framework.
Formatting Values
The input tag helper also provides an asp-format attribute. This attribute allows you to specify a standard .NET string format that will be applied to the value of the input.
For example, if you wanted to display a numeric value to 4 decimal places, you could use the asp-format attributes as follows:
<inputasp-for="SomeNumber"asp-format="{0:N4}"/>
This would have not add any additional attributes to the input element but would format the value of SomeNumber of 4 decimal places.
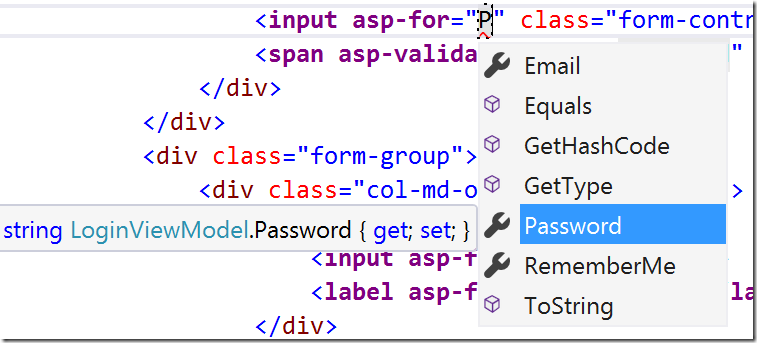
Intellisense and Strong-Typing
Visual Studio 2015 provides Intellisense for the asp-for attribute. As you can see here, it will tell you what properties are available on the current model.
Visual Studio will also highlight errors if we specify a property name that does not exist:
An error is thrown at view compile time. By default, razor views are not pre-compiled when you run your application in Visual Studio so you won’t get the error until you try to dynamically access the page.
Note: At the time of writing this, rename refactorings of model properties do not apply to the asp-for attribute values but I do expect that this will change in the future.
Conclusion
That should cover everything you need to know to start using the input tag helper. In the next blog post, I cover the Validation tag helpers that are used to display client and server side validation messages.
ASP.NET Core MVC introduces a new feature called Tag Helpers. In this post, we will explore how tag helpers can be used to improve the readability of your Razor views that generate HTML forms.
How do Tag Helpers work?
Tag Helpers are an alternative to HTML helpers for generating HTML. The easiest way to show this is with an example.
Let’s start by looking at an extremely simple example of a login view that is bound to a LoginViewModel that contains a UserName and a Password:
Here is how we would generate an HTML input for the UserName property using an HTML Helper and a Tag Helper.
<!--Create an input for UserName using Html Helper--> @Html.EditorFor(l => l.UserName) <!--Create an input for UserName using Tag Helper--> <inputasp-for="UserName" />
With the HTML helper, we call C# code that return some HTML. With Tag Helpers we augment some HTML with special tag helper attributes. These special attributes are processed by MVC which will generate some HTML. Both of these approaches above will generate an input that looks like this:
At first glance, it might look like Tag Helpers are just a syntax change with no obvious benefits. The difference however, can make your Razor forms much more readable. Let’s say we wanted to do something simple like add a class to our UserName input:
<!--Create an input with additional class for UserName using Html Helper--> @Html.EditorFor(l => l.UserName, new { htmlAttributes = new { @class = "form-control" } }) <!--Create an input with additional class for UserName using Tag Helper--> <inputasp-for="UserName"class="form-control" />
As you can see, the HTML helper approach becomes very hard to understand while the tag helper approach is very clear and concise.
Here is a full blown example of a login form using HTML helpers:
@using (Html.BeginForm("Login", "Account", new { ReturnUrl = ViewBag.ReturnUrl }, FormMethod.Post, new { role = "form" })) { @Html.AntiForgeryToken() @Html.ValidationSummary(true, "", new { @class = "text-danger" })
Overall, the tag helper version is much more readable. I especially like that we no longer need to use a using statement to generate a form element. That had always felt like a bit of a hack to me.
Another nice thing with the form tag helpers is that we don’t need to remember to explicitly add the AntiForgeryToken. The form tag helper does this automatically unless we explicitly turn it off using asp-anti-forgery=”false”
Of course, Visual Studio does a good job of highlighting the tag helper attributes so it is easy to distinguish them from regular HTML attributes
We also get full Intellisense inside the asp-for attributes.
How to enable Tag Helpers
The MVC Tag Helpers are located in the Microsoft.AspNet.Mvc.TagHelpers package so you will need to add a reference to that in your project.json file. Once you have added the reference, you can enable tag helpers in all your views by adding the following code to GlobalImports.cshtml.
HTML helpers are still supported in ASP.NET Core MVC and you can keep using them in the same way as you always did. I think Tag Helpers provide a cleaner syntax that more closely matches the HTML that will be generated. Sound off on the comments…what are your thoughts on tag helpers?
Stay tuned, in the next couple posts, we will explore each ASP.NET Core MVC tag helper in more detail.
In my last post we explored how to use the environment tag helper to generate different HTML for Development versus Production environments in ASP.NET MVC6. I very briefly touched on the link and script tag helpers. In this post, we will dig into the details of these very useful tag helpers.
Overview
The link and script tag helpers are intended to make it easier for us to add link and script tags to our HTML. In particular, these tag helpers simplify the process of referencing a large number of files in a development environment, referencing CDNs with local fallbacks and cache busting.
Globbing
No, I’m not making up words. Globbing is a way to specify sets of filename using wildcard patterns. In a very simple example, we could specify all the JavaScript files in a particular folder by specifying the pattern /scripts/*.js. This pattern, however, would not include any of the files in sub-directories. This is where globbing gets more interesting. We can include all JS files in a folder and all subfolders by specifying the pattern /scripts/**/*.js.
That’s nice, but how does this relate to the link and script tag helpers? Well, imagine you are building an web application that consists of a very large number of JavaScript files. When running in production, you will probably want to combine all those files into a single file, but in a development environment it can be convenient to reference each individual file. Remembering to add a new script tag every time you add a new JavaScript file can be tedious and error prone. The script tag helper lets you specify glob patterns for all the files that you want to include.
We could include all the individual script files above using a single script tag helper as follows:
There is also src-exclude attribute if there were a set of files you wanted to exclude from the list. For example, to exclude the services scripts in the example above, we would use the following:
The nice thing about using a glob pattern is that we don’t need to remember to update our HTML every time we add or remove a JavaScript file to our application.
The link tag helper works in exactly the same way with the asp-href-include and asp-href-exclude attributes.
CDNs and Fallbacks
It is a common approach to reference popular frameworks from hosted CDN in order to reduce network load on your server and potentially improve performance for the end user. For popular frameworks like jQuery and Bootstrap, there is a good chance that the browser will already have a cached version of these files.
Referencing files from a CDN can be a bit of a pain because you also need to provide a fallback to a version of the file hosted on your servers. A fallback is necessary because you do not want your application to go down just because the CDN is not currently reachable.
The script and link tag helpers make it easier to specify a fallback test and file location. Here is a basic example for the popular Bootstrap framework:
Cache busting is the process of appending some form of file version hash to the filename of resources like JavaScript and CSS files. The performance advantage of doing this is that we can tell the browser to cache these files indefinitely without worrying about the client not getting the latest version when the file changes. Since the name of the resource changes when the file contents change, the updated files are always downloaded. Mads Kristensen has a really good overview of cache busting in previous versions of ASP.NET. Luckily, the new link and script tag helpers make this MUCH easier.
To enabling cache busting, just set the asp-append-version attribute to true.
Updated Jan. 5 2015: Updated for ASP.NET 5 RC1 Updated May 22 2016: Updated for ASP.NET 5 RC2
Bundling and minification is an important optimization technique for managing scripts and stylesheets in any web application. ASP.NET Core MVC takes a different approach than previous versions to solving this problem. In this post I will illustrate the new approach using a simple example.
How it worked before
In previous versions of MVC, bundling and minification were handled by configuring bundles in the web optimization framework. You would define named bundles of JavaScript or CSS code in a BundleConfig class. Let’s take a simple example where the styles for our application are split into 2 separate files. The style bundle would be defined as follows:
In your razor view, you could reference a bundle using the @Scripts and @Styles helpers. If you were running the application in a Debug mode, the @Scripts helper would add individual script references for each file in a bundle. Likewise, the @Styles helper would render individual links to each CSS file in the bundle.
For example, the following code:
@Styles.Render("~/Content/css")
would render the following HTML when executed in a debug mode:
In a Release mode the web optimization framework would optimize the bundles by generating a single combined and minified file for each bundle that is referenced. The same example above in a release configuration would render the following HTML:
Testing the optimized and non-optimized versions in Visual Studio was relatively easy. You could turn debug mode on/off from the web.config or manually override turn optimization on/off by setting the BundleTable.EnableOptimizations value at application startup.
How it works in ASP.NET Core MVC
The first big change is that the bundling and minification steps happen at build time instead of run time.
Optimizing assets
In previous versions, the optimized file was created on the fly by the web optimization framework. In ASP.NET Core MVC, you are expected to manage bundling and minification using a task runner like Grunt or Gulp. One of the big advantages to using a task runner for bundling and minification is that we have access to a vast number of existing tasks from the grunt and gulp ecosystems.
The default ASP.NET Core MVC project template uses Gulp so I will use that to show how accomplish this.
First, we will add 2 node packages for the gulp package to bundle (gulp-concat) and minify CSS (gulp-minify-css) files. Add these to the package.json file:
You can run this task manually from the command line by calling gulp minifycss:
Another way to run it is using the Task Runner Explorer. Launch the Task Runner Explorer by right clicking gulpefile.js in the Solution Explorer and selecting Task Runner Explorer. From the task runner explorer window, you can run any task by right clicking it and selecting Run.
Important: You can (and should) also configure these tasks to run automatically whenever you change the source css files. See my previous post on using Gulp in Visual Studio for more details on this.
The process for optimizing JavasScript files is very similar to the process for CSS, but we use gulp-uglify instead of gulp-minify-css. We will explore the JavaScript scenario further in the next post.
Now our wwwroot folder contains both optimized and non-optimized versions of our CSS:
Of course, this is just a very simple example of how you might choose to optimize your files. The process is entirely up to you and very flexible. I encourage you to explore the vast set of plugins available.
Managing Development vs Production environments
In previous version of MVC, the @Scripts and @Styles helpers would decide when to reference all the un-optimized files and when to reference the auto-generated optimized versions. The Debug vs Release configuration was used to determine when to use the optimized versions. While this was ultimately convenient from a developer perspective, it was never very clear what was happening. When looking at the razor view, it was hard to tell what has happening.
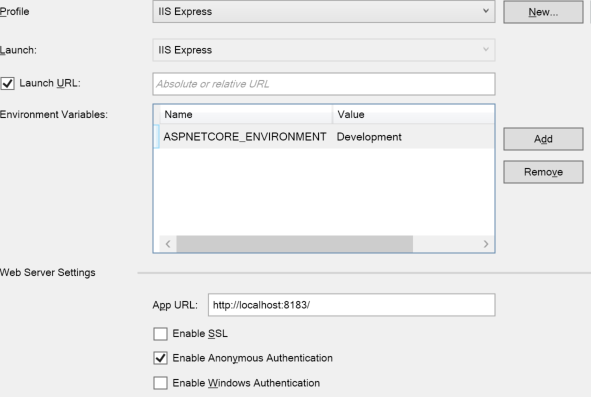
ASP.NET Core you use the ASPNETCORE_ENVIRONMENT environment variable instead of debug/release configurations to decide which files to reference. Typical values for ASPNETCORE_ENVIRONMENT are Development, Staging and Production. The default when running ASP.NET MVC Core from Visual Studio is Development. You can see this by viewing the Properties of your MVC project file in Visual Studio.
In your Razor view, you can use the environment tag helper to decide how to reference your scripts and stylesheets based on the current Hosting:Environment value. The link tag helper is used to append a version to the minified file name in Staging and Production. This technique is often called cache busting. A similar script tag helper exists for referencing script files.
Looking at this razor code, it is much more obvious how a file will be reference in Development vs Staging/Production. In Development, the HTML is as follows:
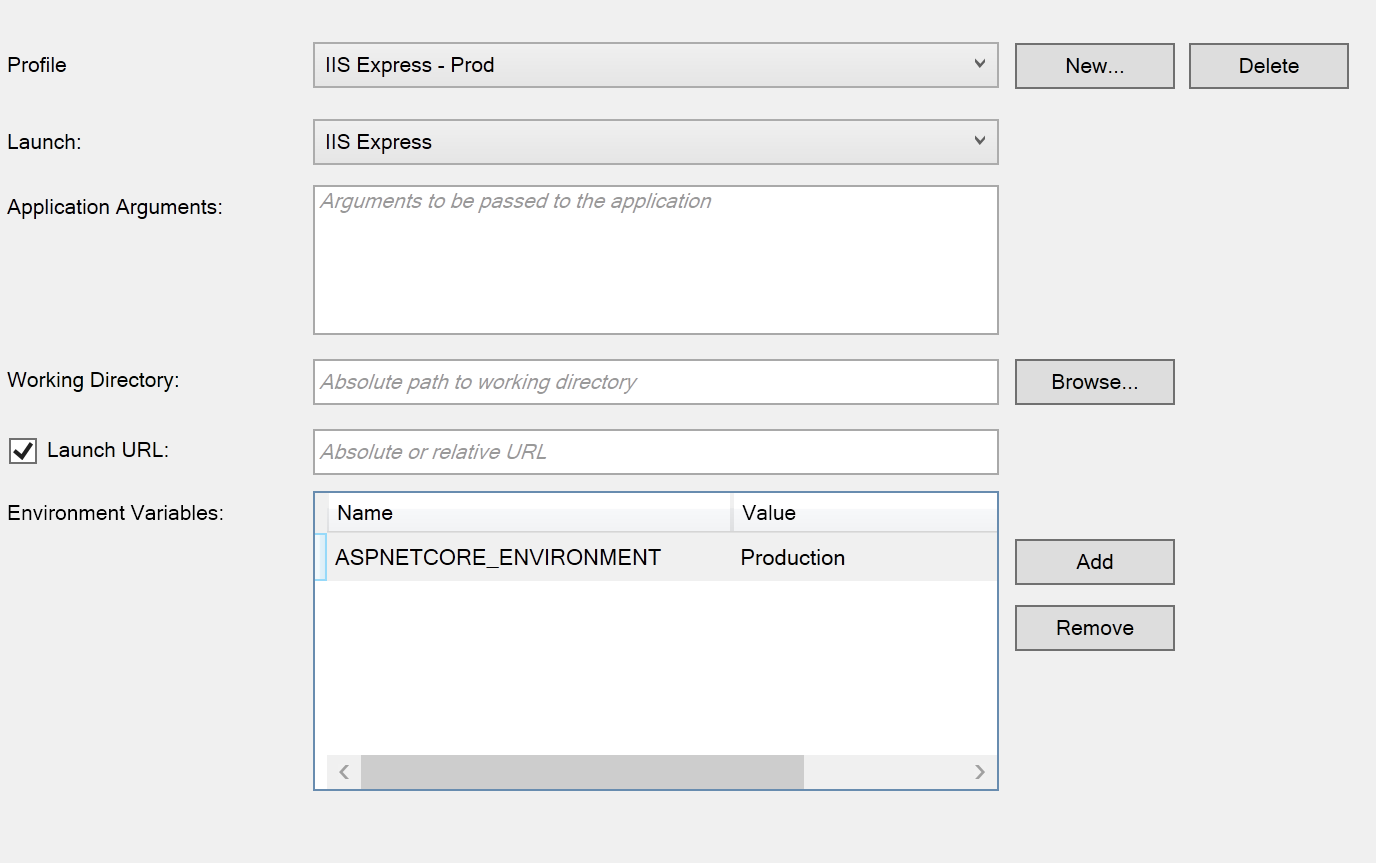
To test Staging or Production builds from Visual Studio, you need to create a new debug profile and set the Hosting:Environment environment variable to the desired value.
Here are some simple steps to create a Production profile:
Right click on your project in Solution Explorer and select Properties.
Select the Debug tab
Click New… to create a new profile and enter ‘IIS Express - Prod” for the name.
For Launch, select IIS Express
Add a new Environment Variable with name ASPNETCORE_ENVIRONMENT and value Production Save your project.
Now, from the Run menu in Visual Studio, you can select the IIS Express – Prod profile to run and test your application using the optimized versions of scripts and styles.
Conclusion
While this new approach for web optimization in ASP.NET Core MVC may seem like a little more work than in previous versions, it does provide much more flexibility and in my opinion aligns better with the majority of the web development world.
We very briefly touched on the link and script tag helpers. There is a lot of functionality available (CDNs, fallbacks, globbing, etc.) in these tag helpers and we will explore these in more detail in the next post –> Overview of Link and Script Tag Helpers in MVC6.